
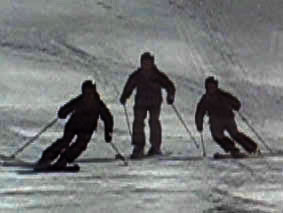
Watch an expert and an intermediate ski down a slope. Which 3 key movement patterns distinguish their performance? You can probably think of quite a few, but these are the ones I always look out for.
Turn Shape
Skiers making Z shaped curves down the slope instead of S shapes are not using the design of the ski to influence speed and direction. They will twist the skis too much at the start of the turn, then use a whole load of effort to control the resulting sideways skid. It’s inefficient and tiring. By contrast, experts use a patient entry into the turn, establish the correct initial steering angle, then let the ski do the work for the rest of the turn.
How do you improve turn shape? Firstly, try counting 1,2,3,4 through each turn. By the count of 2, your skis should be pointing down the fall line – no earlier!
Secondly, follow the tracks of an expert down the slopes for a while. Make sure you find someone who is willing to go at your speed, or you will be fighting just to keep up. Most of my intermediate friends say they ski better following me – that’s down to turn shape.
Crossover
Crossover describes the movement of the body across the skis during the transition from one turn to the next. At the crossover point, the skis are flat on the snow as they roll from one edge to the other.
There are two crucial parts to crossover. Firstly, the body must move down the slope, to the inside of the new turn. At some point it must be perpendicular to the slope, otherwise the skis will not release into the new turn and the skier will end up twisting or stemming. Experts use the flattening of the skis at crossover to establish the correct steering angle for the upcoming turn.
Secondly, the body must release into the new turn at the correct diagonal angle. Beginners and intermediates are usually taught to point the body down the fall line, but in reality the body needs to move in the direction of its momentum. So, long radius turns will have a shallow angle of release, with the body moving more or less along the direction of the skis. Short radius turns will have a steep angle of release, with the body moving across the skis, more directly down the slope.
Two good exercises for crossover are one-ski turns and braquage (pivot slips).
For one-ski turns, traverse across a slope, lift your downhill ski, then turn. You will only be able to launch a turn if you commit your body down the hill. Then repeat on the other side. Eventually, you will be able to do away with the traverse, and link one-ski turns together.
For braquage, sideslip down a slope, then twist the skis into the fall line, then continue to twist into a sideslip on the opposite side. If you don’t crossover correctly and get your body perpendicular to the slope, the skis won’t release and you will end up doing mini-turns. After a bit of practice, you should be able to go straight down the fall line in a corridor no wider than the length of your skis. Well, probably a lot of practice – there are quite a few instructors who can’t do good braquage.
Angulation
Intermediates don’t angulate enough – or in some cases at all. The principle behind angulation is this: you need to edge the skis to make them turn. The more you edge them, the more you turn (see carved turn radius). Simply banking the whole body into the turn doesn’t produce enough edge angle, and it transfers pressure to the inside ski which makes the skis skid instead of gripping.
 Angulation means breaking the body at the pelvis/hips, so that the legs are at more of an angle than the upper body. Imagine a triangle between the shoulder, hip and ankle and you’ve got the idea. Countering, in which the pelvis and hips are rotated slightly to the outside of the turn, will improve angulation – imagine sitting to the side on a stool.
And when you angulate, you had better make sure you have a relaxed lower back, otherwise you will struggle with incorrect pelvic tilt.
How to practice angulation? Here’s one good exercise: hold your ski poles like swords, then as you turn, draw a line in the snow to the side with your outside pole. You will only be able to get the pole to touch the snow if you angulate properly.
To get a better idea of the position for angulation, try this. Stand sideways about 1 to 2 feet from a wall. Now let your body fall towards the wall so that your hip is resting against it. That’s angulation! To get an idea of how countering feels, repeat this, but with your toes pointing slightly more to the outside than your heels.
Or try this: stand next to a wall or some other support; make a BIG snowplough shape with your legs; now move just the inner leg/foot parallel to the other while supporting yourself against the wall with your arm. The resulting position is a countered, angulated, parallel stance. Get this: 90% of an expert parallel stance is already there in a snowplough!
To summarize: although there are many elements to expert performance, concentrating on the 3 key points above will get you well on the way.